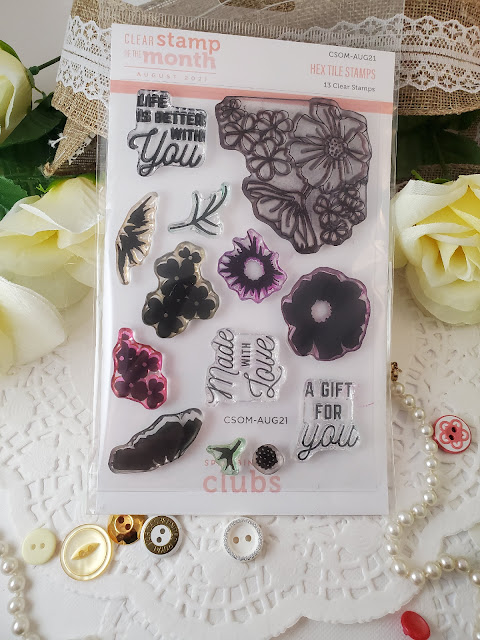
Greetings crafty friends. Today I'm sharing some fun and easy cards I made using Spellbinders Hex Tile stamps with their clear stamp of the month for August 2021. I picked this stamp set up on sale but sadly didn't get the coordinating die set.
 |
| Stamp Set |
 |
I like the paint splatter in this one.
|
Since I don't have the die set I decided to do a flat card. I didn't want to bother with fussy cutting. I stamped images into the corners of my cardstock using the Misti stamp tool and Memento black ink. Next, I colored in the flowers with Prismacolor colored pencils and opted not to "build" them with the included stamps. I blended my colored pencil using some mineral spirits and a brush for a watercolor-like effect. After the flowers were colored I restamped my images to make the lines bolder. This is easily done using the Misti and makes a big difference in the finished product. I used watercolor to outline the design in light blue and then splattered it with some Liquitex liquid acrylic paint making sure to cover my flower images. The silver "celebrate" sentiment and heart stickers are also from Spellbinders. To finish this card off I added some black gems and layered my panel onto black cardstock before mounting it all to my A2 card.
 |
I really love Catherine Pooler's inks.
|
With this card, I stamped my images in all corners and used the flower builder stamps to color in the flower images. I also stamped some green leaf fronds to fill in the empty space in the middle of the design. I tested out my new Catherine Pooler ink pads from the Date Night collection and really love how bright and vibrant the finished flowers are. I stamped over my flower images again in Memento black ink to make the lines bolder. I did have a bit of an offset on one of the images, but it's handmade and imperfection is part of the charm, right? Again, I did some splattering with Liquitex liquid acrylic making sure to cover most of my flower images. I stamped the "life is better with you" sentiment from the stamp set onto a die-cut and heat embossed it with Versafine ink and Wow clear embossing powder. I added a few black gems and layered the panel onto black cardstock then mounted it to the card base.
 |
Using Distress Oxides and Catherine Pooler Inks
|
This card is a tad bit messy but I still think it works. I went through the same previous steps for stamping my images. I used a combination of the Date Dight Catherine Pooler inks and some Distressed Oxides. You may notice one set of flowers is a bit brighter than the other and this is because I stamped the flower builder stamps twice with new ink each time, instead of just once on the other image. I opted to use a yellow watercolor background and ended up running some of the pigment into one of my flower sets. The paint splattering was also a bit clumsy as you can see my large splatter mark. 😅 I opted for some petite black ribbon wrapped around my card panel and secured it on the back with some tape before mounting the layered die-cut sentiment onto the middle. Again, I layered this panel onto black cardstock and mounted it to the base.
 |
I actually like all the space in this card.
|
This card is actually the first one I made using the stamp set. Because of the corner shape of the flower stamp, I found few options for placement other than around the edges of the cardstock. I suppose I could have come up with more design options had I wanted to fussy cut individual flowers from the stamped images. Here you can see I kept the flowers to the bottom of the card and left an ample amount of space for splatter. In this card, I used the colored pencil, and mineral spirit technique to color the flowers. I had the "thinking of you" sentiment hanging out on my desk and plopped it on. As for the rest of the card, you know the drill, splatter, gems, layer, and mount.
Thanks for checking out my blog today. If you've got questions or comments drop them below. If you like my content and want to see more, follow me on IG @craftinbish. Now, go make something! 😀


Comments
Post a Comment